WORK FOR THE DAYS FROM THE 11th TO THE 29th OF MAY
WORK FOR THE DAYS FROM THE 4th TO THE 8th OF MAY
Your last task for this term will be to program a game with Scratch. You have plenty of possibilities, so spend some time to think what kind of game you are going to do and how it's going to work before you start.
Keep in mind that the more functionalities your game has the better your mark will be. Remember that in the exercises we've been doing these last weeks we've used blocks from the following sections:
- Motion: blocks move, turn, go to...
- Looks: blocks change size, change costume, say messages...
- Events: that allow to start a program or to do a certain action when a key from your keyboard is pressed.
- Control: blocks wait, forever, if, repeat, repeat until...
- Sensing: to allow interaction between the characters.
Of course, it is not necessary to use all the blocks that we've been using, but do not limit yourself to just a few of them. If you feel like using some new blocks that we haven't explained feel free to do it as well.
It would also be great if you use more than one character (sprite), if you add a background or if your game can be played by more than one person at the same time... But those are just some ideas, do what you consider best.
In case you don't know how to start you can have a look at the following games:
Once your program is finished you will have to send it to your teacher's email with a little explanation about how it works. If you have any doubt while trying to program you game let me know by an email to ivan.carbajo.profesor@gmail.com.
________________________________________________
WORK FOR THE DAYS FROM THE 4th TO THE 8th OF MAY
For the next week you will have to continue working on Scratch. These are going to be the last guided exercises. After them you will be asked to desing a game on your own, so it is very important you learn how to use the new blocks. The four exercises you must do are bellow, but before you try to to them you should view the 3 examples to understand how the new blocks work.
These are the new blocks you will need to make the exercises (you may need to use the ones you've used in the previous exercises as well), they belong to the Control and Sensing section of the menu of Scratch:

The two Sensing blocks must be introduced in the gap of the Control blocks so a lot of different combinations are possible.
The following examples should be enough for you to understand how the new blocks work (in the three examples you must press the Green Flag for the program to start working):
- FIRST EXAMPLE: Imagine you want to make the cat say "I touched it" for 2 seconds each time it touches the ball. This would be the program:
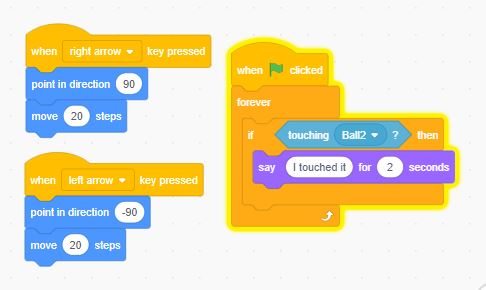
If you don't remember how to make the cat move to the left and to the right or you don't remember how to add a ball (new sprite) chech the work from previous weeks.
IMPORTANT: realize that all the actions must be introduced inside a forever block. Otherwise, the cat will say the message only if it is touching the ball when you press the green flag. By adding the forever block you make the program constantly check if the cat is touching the ball.
This would be the result:
- SECOND EXAMPLE: Now imagine you want make the cat constantly change its custom to the next one each second until you press the space key. This would be the program:
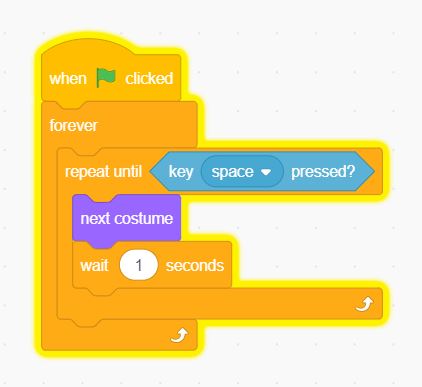
Again, it is important to introduce all the blocks inside a forever block, otherwise the cat will only change its costume if the space key is pressed when you press the green flag for the first time.
And this would be the result:
- THIRD EXAMPLE: Finally imagine you want to make the cat disappear each time it touches the mouse pointer and make it appear otherwise. This would be the program:

Realize the importance of the forever block.
And this would be the result:
________________________________________________
The four exercises you need to do during this week are:
Program 22: make the cat think "I've been caught" for 1 second each time the mouse-pointer is touching it.
Program 23: make the cat set its size to 200% each time it touches the mouse and set its size to 50% each time it touches the dog. You can try the program bellow (use the left and right keys to move the cat):
Program 24: Make the cat disappear (block hide) when the dog touches it and make the mouse disappear (block hide) when the cat touches it. Remember that you need to select the character you want to program in each case.
Program 25: make the cat move up 80 steps to the right wait half a second move 80 steps to the left and wait half a second. Repeat that constantly until you press key letter a.
Don't forget, try to send all your exercises in the same email and indicating the number of the exercise to the email address of your technology teacher.
WORK FOR THE DAY FROM THE 21st TO THE 27th OF APRIL
So, if you have time, it would be a good idea if you practice and check some new blocks apart from the ones we've been using. You can also start thinking about how your game will be as well.
The only new exercise is this one:
Program 21: make a program that allows you to control two characters at the same time (a cat and a dog for example). One of them with the keys: 4-left, 6-right, 8-up and 2-down; and the other with the keys: a-left, s-right, w-up and z down).
When you add more than one character at the same time you have to give orders to both of them. For example, if I want to control a cat and a dog I'll have to do the following:
- First: select the cat at the botton-right part of the screen. Then add the blocks needed to move the cat (the same you used in exercise 4 at the begining of this unit).

- Second: select the dog at the botton-right part of the screen. Then add the blocks needed to move the dog.

The reason why I'm only asking you to do one exercise this week is that I want those of you who still have some programs to send me to do it along this week. I'll send a message to each of you in order to remind you what exercises you still haven't done.
Don't forget, try to send all your exercises in the same email and indicating the number of the exercise to this adress: ivan.carbajo.profesor@gmail.com
________________________________________________
WORK FOR THE DAYS FROM THE 14th TO THE 20th OF APRIL
For the next week you will have to continue working on Scratch. These will be the new blocks you will need to make the exercises (you may need to use the ones you've used in the previous exercises as well):

- The When this sprite clicked block, from the Events section, starts a program when you click over the character (the cat for example.
- The Forever block, from the Control section, repeats one or several actions once and again. As it happened with the Repeat block you need to introduce inside that block the orders you want to repeat.
- The Show and Hide blocks allow the character to appear or disappear at a certain part of the program.
- Finally, the 4 last blocks make the character Say or Think a message, for ever or for a period of time.
________________________________________________
The four 4 exercises you have to do for this week are:
Program 17: Make the cat say "Good morning my friend" for 3 seconds each time you click on the cat.
Program 18: When the space key is pressed make the cat move up 40 steps up, then think "I'm up" for one second, then move 40 steps down and think "I'm down for 2 seconds".
Repeat this once and again forever.
Program 19: When the green flag is clicked move the cat to position x=-50 y=0, wait one second and make it disappear.
Then move to position x=0 y=50 make it appear wait one second and make it disappear.
Then move to position x=50 y=0 make it appear wait one second and make it disappear.
Finally move it to position x=0 y=-50 make it appear wait one second and make it disappear.
Then make the cat appear and say "hello" for one second and after that say "bye bye" for 0,5 seconds and disappear.
Repeat these actions once and again forever.
________________________________________________
How to send the exercises?
________________________________________________
WORK FOR THE DAYS FROM THE 26th OF APRIL TO THE 2nd OF MARCH
Revew exercises for the retake exam on electricity (the date is still unknown):
https://drive.google.com/open?id=1hukm8RWm0bNAc97YJFJkATkwjtKMYWTj
Solutions of exercises 1 to 10: https://drive.google.com/open?id=1ZX5c_o5CSGJ2jWcioFzyIGCm_zUHDoyn
________________________________________________
For the next week you will have to continue working on Scratch. In this case you are going to learn how to use the most useful blocks of the Looks section of the menu. The solutions to the first 10 exercises will be uploaded to this blog on Monday the 30th of march.
These will be the new blocks you are going to need to make the exercises:

In the next exercises we are not going to control the cat but a different character (the hare in mi case). To use a different character you have to follow the next steps:
- Delete the Cat:

- Open the characters (also called sprites) section:
- Search a new character and select it:

- Once you've done this the new character will appear in your screen. Then click in Costume (disfraz):

- There you will find several images (costumes) that represent the same character in different positions. In my case the hare has three different costumes:

How to use the different costumes of a character?
- The switch costume to_____ block allows to change the costume of a character.
For example, with the following program each time you press the letter a key the hare takes the first costume and each time you press the letter b key the hare takes the second costume:

- The next costume block makes the character take the next costume of the list.
- The change size by__ block allow to change the size of the character a given amount. If the value you introduce is positive (10 for example) the character will become bigger, while if the value is negative (-20 for example) the character will become smaller.
For example, with the following program, each time you press the down arrow the size of the character decreases in 5:

- The set size to__% block is similar to the block before but directly sets the size of the character to a percentage of its current size.
Finally, set rotation style_____ of the motion section allows to change the direction of the character in different ways. The following programs allow to move the character to the left and to the right with the left arrow and right arrow keys. But they do it in three different ways. You can check the difference by yourself in Scratch:

Exercises for the week:
Delete the cat add a new character (a hare for example) and continue with the exercises...
Program 11: each time the Green flag is clicked the hare moves to the centre of the screen (go to x:0 y:0) and switches it costume to the next one.
Program 12: when the letter a key is pressed the hare moves to the centre of the screen and increases its size in 10. When the letter b key is pressed the hare moves to the centre of the screen and decreases its size in 10.
Program 13: when the letter a key is pressed the hare moves to the centre of the screen and doubles its size (200%). When the letter b key is pressed the hare moves to the centre of the screen decreases its size to half (50%).
Program 14: each time the left arrow key is pressed the hare moves 40 steps to the left. But each time it moves it switches its costume to the next one. Each time the right arrow key is pressed the hare moves 40 steps to the right. Changing its costume each time it moves as well.
Program 15: when the space key is pressed the hare moves to the centre of the screen then switches it costume to the next one 12 times (use the block repeat__, from the control section)
Program 16: when any key is pressed the hare moves to position x:-170 y:0. Then repeats the following three actions nine times (with the repeat__ block):
- Point to the right.
- Move 40 steps.
- Switch costume to the next one.
- Wait 0.5 seconds.
________________________________________________
How to send the exercises?
By email (as the previous exercises) to ivan.carbajo.profesor@gmail.com. The death line is the 2nd of April (included).
Please try to send the links to the six exercises in the same email. Something like this is perfect:
 |
| Example of how to send the work by email. |
IMPORTANT!
Do not delete the previous exercises from your account. If you delete them the links your are sending me won't take me to you programs and I will not be able to correct them.
_______________________________________________
We will study two units in the third term in technology:
_______________________________________________
WORK FOR THE DAYS FROM THE 12th TO THE 25th OF MARCH
We will study two units in the third term in technology:
1) Materials: in which the different types of materials (metals, plastics, textiles, ceramics...) and its properties will be studied.
2) Computer programming: where an introduction to programming will be done with the use of Scratch.
As it is not going to be possible to continue with the unit of materials while you stay at home, your work for this period will be related to the computer programming unit.
IMPORTANT: Those of you who need to do the retake exam of the second term (I will tell you the date the first day of class) should study the theory about electricity that you can find in this blog. We will also spend one hour revising the problems before the exam (they are going to be very similar to the ones we have been doing along the second term).
IMPORTANT: Those of you who need to do the retake exam of the second term (I will tell you the date the first day of class) should study the theory about electricity that you can find in this blog. We will also spend one hour revising the problems before the exam (they are going to be very similar to the ones we have been doing along the second term).
UNIT 4: COMPUTER PROGRAMMING.
Please read this guide slowly to understand what you must do during these two weeks that you are going to stay at home. The instructions about how and when to send me your work is at the end.
How to access your scratch account?
Go to the web page of Scratch: https://scratch.mit.edu/
If you were able to register last day in class sign in with your username and password. Remember, your password should be iesfraganumber (writing the number I gave to each of you the last day of class instead of the word number).

IMPORTANT!! In order to share the programs you need to validate the registration by accepting the email you receive after you register.
If you didn't register in class you need to register by clicking in Join Scratch.
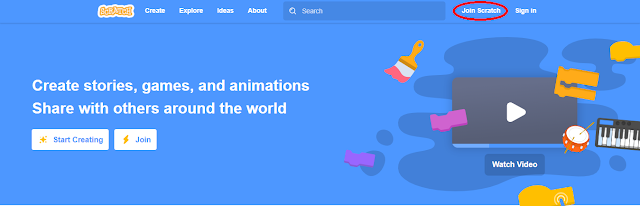
It would be great if you do it with the email, password and number I gave to you in a sheet of paper last day in class (in this case I will have to validate the registration). Anyway, if you have lost it (or you were not in class last day) you can use another email and password and validate it by yourself in your email account.
What is programming?Go to the web page of Scratch: https://scratch.mit.edu/

If you were able to register last day in class sign in with your username and password. Remember, your password should be iesfraganumber (writing the number I gave to each of you the last day of class instead of the word number).

IMPORTANT!! In order to share the programs you need to validate the registration by accepting the email you receive after you register.
If you didn't register in class you need to register by clicking in Join Scratch.

It would be great if you do it with the email, password and number I gave to you in a sheet of paper last day in class (in this case I will have to validate the registration). Anyway, if you have lost it (or you were not in class last day) you can use another email and password and validate it by yourself in your email account.
Programming is giving orders to a computer and telling it what to do. A group of several orders with a specific purpose is what we call a computer program.
________________________________________________
Example: when we are going to send an email and we press the button Send there is a computer program that tells our computer what to do:
a) Check the email address to which it must be sent.
b) Send it to that address.
c) If everything is ok write the message "Your message has been sent".
d) If the email address does not exist write the message "That email address does not exist".
From the moment we turn the computer on a computer program tells it what to do.
________________________________________________
What is Scratch?
Scratch creates programs which give orders to a series of characters (called Sprites): animals, objects, persons, letters... They will obey the orders we put in the program. For the moment we are going to use the default character of the program: a cat.
Scratch gathers the different types of order you can use for the programs in several groups: Motion (related to movement), Looks (related to appearance), Sound, Events (related to things that happen, as for example pressing a key or clicking with your mouse), Control (for more complex orders, such us repeating a group of orders several times), Sensing (related to actions that occur when a character touches another character or object, for example)...
For the moment we are just going to use the Motion, Control and Events orders of the menu.
How to make a program and send it to the teacher?
Example: we are going to order the cat move 20 steps to the right each time we press the right arrow key.
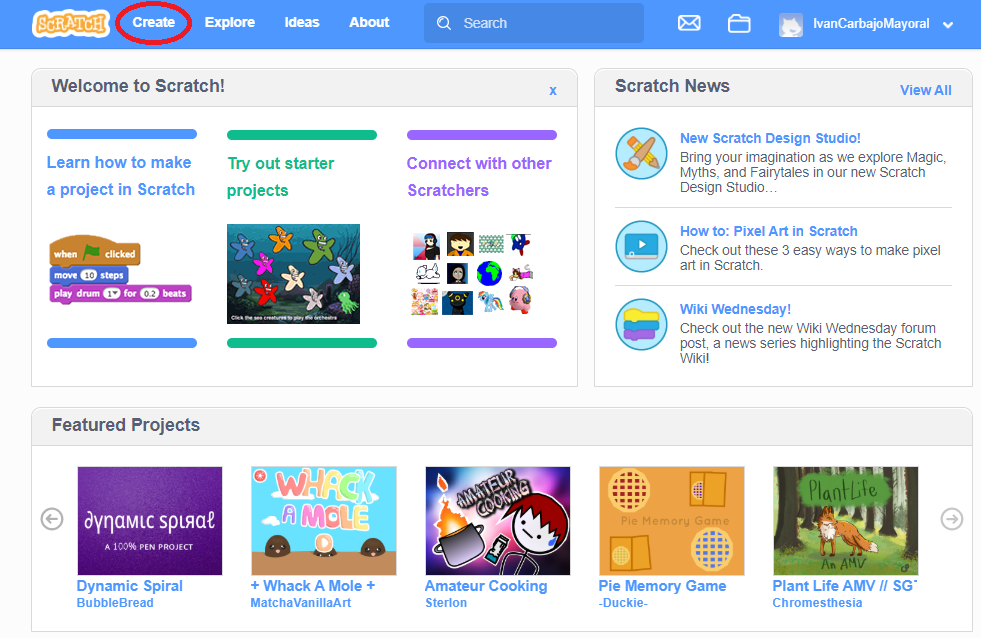
- Once you have entered the program click in Create to start a project. As it will be explained later in this guide, during these two weeks you will have to create 10 different projects.
- For the moment we are always going to work in the Code tab, so make sure it is selected.

- First, go to Events and drag the following block into the program's area:

- And select the Right arrow key:
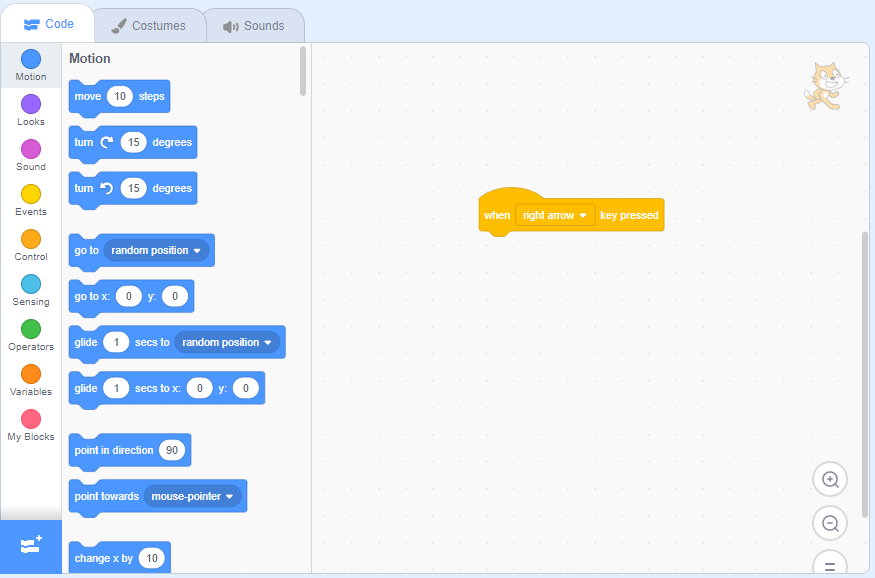
- Then, go to Motion in the menu and drag the following block, placing it just under the first block:


Now you can check how the cat moves a little bit to the right (20 steps) each time you press the Right arrow key of your keyboard.
In order to send that program to the teacher you have to:
a) Write the name of the program (Program1, Program2, Program3...).
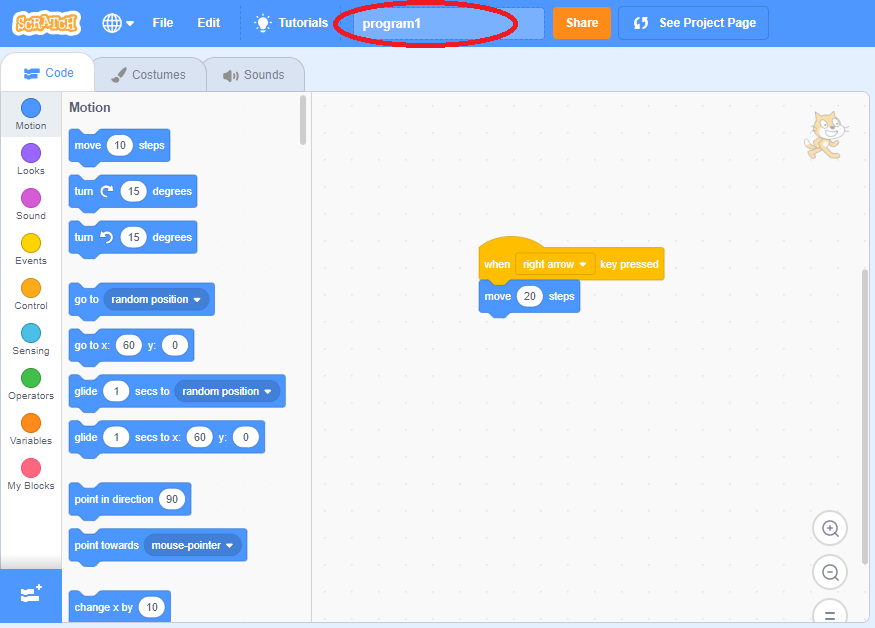
b) Save the program by clicking File -> Save now:

c) Then go to My stuff by clicking in the folder icon:

d) Select the program you want to share:

e) Click in Share.

f) Click in Copy link.

g) And finally paste that link in an email to send it to me.

h) After that, to create a new program click in Create, and start the whole process again.
In the next section you will find several exercises you must try to do in your Scratch account. Once the program does what it is supposed to do you must save it and then share it to me by email (ivan.carbajo@educa.madrid.org) writing your name and the level (1st of ESO).
The work must be done in two parts:
- You must do the first 5 exercises before Friday the 20th of march. You will have to send me an email with a link to each of the exercises from 1 to 5 before that day.
- The last 5 exercises must be done before Wednesday the 25th of march. So you will have to send me an email with a link to each of the exercises from 6 to 10 before that day.
To make the exercises you will need to use the following blocks from the groups Motion, Control and Events to make the programs:

Events blocks: are used to start a program. You can start a program by clicking the Green Flag (first block of the image) or by clicking any other key of your keyboard (second block of the image):

Motion blocks: are used to move the characters of the program in several ways:
- The move_steps block moves a character a certain number of steps in one direction.

- The point in direction__ block allows to set the direction in which the character will move.

- The turn__degrees blocks allow to rotate a character clockwise or counter-clockwise a certain angle:

- The go to x:__y:__ block automatically moves the character to the position specified. Keep in mind that the centre of the screen is the point x=0, y=0.

- The set x to__ block changes the horizontal position of the character the number of steps specified. The set y to__ block does the same but with the vertical position of the character.

- The change x by__ block adds a certain number of steps to the horizontal position of the character. The change y by__ block does the same but with the vertical position.

Control blocks: are used in many cases. The ones that you will need for the moment are:
- The wait__seconds block that stops the program for a certain number of seconds.

- The repeat__ block, that allows to repeat one action or a group of actions several times.

Example 1. The next program does the following: when the letter s of the keyboard is pressed moves the cat to the position x=-40, y=10. Then moves the cat 40 steps to the right (90º), waits one second, moves the cat another 60 steps to the right and waits two seconds. Then rotates the cat 90 degrees clockwise and moves it 30 steps down, waits one second and moves it another 30 steps down.

Example 2. When the Green Flag is clicked the character moves the 10 steps to the right and waits half a second. Then automatically repeats the same two actions (move and wait) nine more times.

_________________________________________________________________________________
To make the next exercises you have to decide how to place the different blocks that have been explained before and the values that must be introduced.
Program 1:
- The program starts when the Green Flag is clicked.
- Move the cat to position x = 50, y = 70 (position x = 0, y = 0 is the centre of the screen).
- Move it 20 steps to the right.
- Wait one second.
- Move it 40 steps to the right.
- Wait one second.- Move it 80 steps to the right.
- Wait one second.
Program 2:
- The program starts when the key letter u is pressed.
- Move the cat to position x = -50, y = 100.
- Wait two seconds.
- The program starts when the Space key is pressed.
- Move the cat to position x = -200, y = -200.
- Wait one second.
Program 6:
- The program starts when the key letter w is pressed.
- Move the cat to position x = 40 y = -70.
- Wait 3 seconds.
- Change the x position of the cat to -80. [block Set x to__]
- Wait 3 seconds.
- Change the y position of the cat to 30. [block Set y to__]
- Wait 3 seconds.
- Add 50 steps to the x position of the cat. [block Change x by__]
- Wait 3 seconds.
- Add 30 steps to the y position of the cat. [block Change y by__]
Program 7:
- When the Green Flag is clicked the cat must move to position x = - 60, y = -60.
- Then move over the sides of a square whose sides measure 90 steps, waiting one a half a seconds after each move.
Program 8:
- When the Space key is pressed the cat must move to position x = - 80, y = -80.
- Then move over the sides of an equilateral triangle (same length for its three sides) whose sides measure 120 steps, waiting half a second after each move.
Program 9:
- When the key letter a is pressed the cat must move to the centre of the screen.
- The start moving up and down a distance of 70 steps 10 times in a row, waiting one second after each movement. [block Repeat]
Program 10:
Make the cat move as in exercise 7 (making a square) but in this case using the Repeat block to make it shorter.
________________________________________________
- The program starts when the key letter u is pressed.
- Move the cat to position x = -50, y = 100.
- Wait two seconds.
- Move it 30 steps to the right.
- Wait one second.
- Move it 30 steps to the right.
- Wait one second.
- Move the cat to position x = -100, y = -50.
- Wait two seconds.
- Move it 60 steps to the right.
- Wait one second.
Program 3:
Program 4:
Program 5: In this program the cat must move as in a stair.- Move it 30 steps to the right.
- Wait one second.
- Move the cat to position x = -100, y = -50.
- Wait two seconds.
- Move it 60 steps to the right.
- Wait one second.
- Move it 60 steps to the right.
- Wait one second.
- When the left arrow is pressed the cat moves 40 steps to the left.
- When the right arrow is pressed the cat moves 40 steps to the right.
- When the key number 8 is pressed the cat moves 20 steps up.
- When the key number 2 is pressed the cat moves 20 steps down.
- When the key number 4 is pressed the cat moves 20 to the left.
- When the key number 6 is pressed the cat moves 20 to the right.
- The program starts when the Space key is pressed.
- Move the cat to position x = -200, y = -200.
- Wait one second.
- Turn the cat 90 degrees to the left (counter-clockwise).
- Move it 40 steps up.
- Turn the cat 90 degrees to the right (clockwise).
- Move it 40 steps to the right.
- Turn the cat 90 degrees to the left (counter-clockwise).
- Move it 40 steps to the right.
- Turn the cat 90 degrees to the left (counter-clockwise).
- Move it 40 steps up.
- Turn the cat 90 degrees to the left (counter-clockwise).
- Move it 40 steps up.
- Turn the cat 90 degrees to the right (clockwise).
- The program starts when the key letter w is pressed.
- Move the cat to position x = 40 y = -70.
- Wait 3 seconds.
- Change the x position of the cat to -80. [block Set x to__]
- Wait 3 seconds.
- Change the y position of the cat to 30. [block Set y to__]
- Wait 3 seconds.
- Add 50 steps to the x position of the cat. [block Change x by__]
- Wait 3 seconds.
- Add 30 steps to the y position of the cat. [block Change y by__]
- When the Green Flag is clicked the cat must move to position x = - 60, y = -60.
- Then move over the sides of a square whose sides measure 90 steps, waiting one a half a seconds after each move.
Program 8:
- When the Space key is pressed the cat must move to position x = - 80, y = -80.
- Then move over the sides of an equilateral triangle (same length for its three sides) whose sides measure 120 steps, waiting half a second after each move.
Program 9:
- When the key letter a is pressed the cat must move to the centre of the screen.
- The start moving up and down a distance of 70 steps 10 times in a row, waiting one second after each movement. [block Repeat]
Program 10:
Make the cat move as in exercise 7 (making a square) but in this case using the Repeat block to make it shorter.
________________________________________________
UNIT 3: MATERIALS.
 |
| Millau Bridge (France) |
 |
| AVE, high speed train (Spain). |
 |
| Taj Mahal palace (Agra, India). |
 |
| Palacio de Cristal, Retiro Park (Madrid, Spain). |
 |
| Robotic arm. |
 |
| Eiffel Towe (Paris, France). |
 |
| Car on a road. |
 |
| Todaiji Temple (Nara, Japan). |
 |
| Palacio Episcopal de Astorga, designed by Gaudi (León, Spain). |
 |
| Smartphone. |
 |
| Guggenheim Museum (Bilbao, Spain). |
All the contents of this unit (materials) are summarized in the following schemes, that will be completed and corrected in class.


_________________________________________________________________________________
UNIT 2: ELECTRICITY AND ELECTRIC CIRCUITS
Everything that surrounds us is
made up of tiny particles called atoms. Combining the 102 different types of
atoms that have been discovered we can make absolutely everything: wood, air,
water, a coin, stones…

All types of atoms are made from
just three different particles:
-Protons
-Neutrons
-Electrons
For example, atoms of oxygen are
made up of 8 protons, 8 neutrons and 8 electrons.
Protons and neutrons are together
in the centre of the atom (nucleus)
while electrons rotate around the nucleus.

Electricity are all those phenomena
that imply the movement of electrons. There are several examples of electrical
phenomena:
-Rays.
-Static
electricity.
-Electric
current.
-Electromagnetic
waves.


In this unit we are going to focus
in just one electric phenomenon: electric currents.
Just as a water current flows
through a pipeline, electrons can flow through wires.

In order to conduct electrons the materials needed to make wires must have one property: electric
conductivity.
Those materials with a good electrical conductivity are called electrical
conductors. Metals are the
material with the best electrical conductivity, so they are the best electric conductors.
On the other hand, materials with a
bad electrical conductivity are called electrical
insulators. Plastics are
the materials with the worst electrical conductivity, so they are the best
electric insulators.

However, usually, electrons are
rotating around the nucleus so…
What
makes an electron start flowing through a wire?
If we connect a battery to both
edges of a wire it will start conducting electrons, then we will have an
electric current. In an electric current millions of millions of electrons are
pushed through the wire.

Both water and electric currents
can be large or small:

There are two qualities that must
be considered when we describe an electric current:
1) The amount of
electrons it carries, is called intensity. We
say that an electric current big or small intensity depending on the amount of
electrons it carries.
- Intensity is measured in amperes
(A).
2) The energy of
the electrons that flow, is called voltage. The level of the electric current's itnensity depends on the amount of electrons it is carrying.
- Voltage is measured in volts
(V).
If we compared electric currents
with water currents…

Some typical values of voltage and intensity are:

An electrical circuit consists in
several electric components connected so that the current can leave the battery and then return to it.

Types of batteries:

Types of bulbs:

Types of motors:

Types of buzzers:

Types of resistors:

Diodes and LEDs:

There are two basic ways in which
to connect several circuit components:
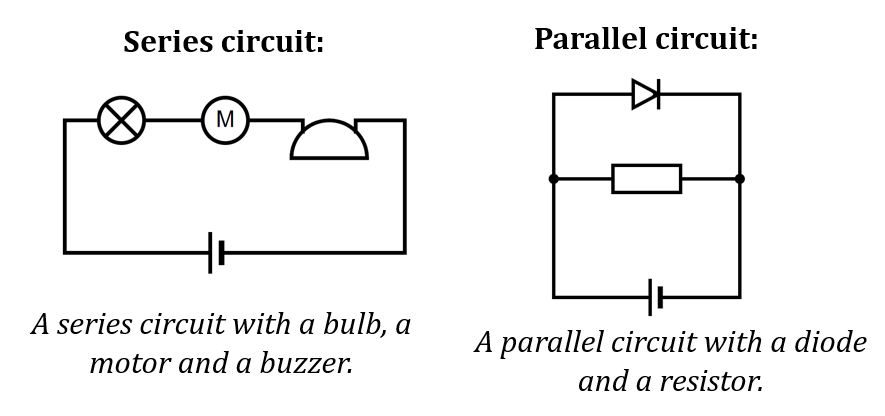
Finally,
if both types of circuit are mixed, we get a series-parallel circuit:

____________________________________
UNIT 1: TECHNICAL DRAWING.
Task 7 (Dimensioning): https://drive.google.com/file/d/11Azcbb_z9DhnYxKNsRWCyiV38pIc4U1h/view?usp=sharing


_________________________________________________________________________________
COMPUTER DESIGN: TINKERCAD
1) Draw the following pieces in Tinkercad considering that each little cube should measure 10x10x10 millimetres:


2) Open a new project and draw the following object with the correct dimensions. Distances that do not appear in the image can be calculated by adding or substractig the others:

3) The Parthenon is a temple whose construction began in 447 BC and finished in 438 BC. It was dedicated by people of athens to their goddess Athena and is considered the most important building of Classical Greece. Open a new project in Tinkercad and represent the Parthenon with as much detail as possible.
 |
| The Parthenon nowadays, more than 2450 years after it was built. |
 |
| A full-scale replica of the Parthenon built in Nashville (United States) in 1897. |


No hay comentarios:
Publicar un comentario